Catholic • artist • gardener • seamstress • lover of all things domestic • and sometime attorney
Tuesday, September 25, 2012
A Dress into an Apron
I could hardly believe my eyes when I saw the pristine Boden dress hanging on the thrift store rack--my size, a beautiful color, $4.00. I tried it on and discovered that while it fit, the cut was wretched--no wonder it ended up donated. I brought it home anyway. It's destination: apronhood.
Here's how to do it. First, get bold with the scissors. Cut straight up one side seam, around the sleeve, leave yourself a nice curved neck piece in back, then back down the other side. In the case of a side zipper, cut it off carefully (protect your good scissors).
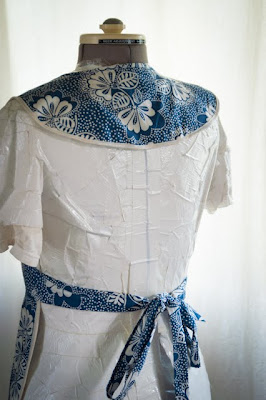
Here the back top is done (I eyeballed the yoke, then checked it for symmetry afterwards). Just the skirt left to do. The dress already had waist ties--I was able to leave one of them on, but the other had to come off because of the zipper. No problem, I just trimmed it off and will reattach it in a second. If the dress didn't have ties, I'd make some out of the sleeves.
Now I've got the basic apron form ready and hanging on the dress form. See the little points above the waistband? Yes, I trimmed those off to have a nice smooth line going down the side of the apron.
Since my dress was gorgeous and Boden, it was lined with a lightweight cotton, so I set the machine stitch size to long and basted the fashion fabric and lining together all the way around, 1/4 inch from the outside edges. It's also time to baste the waist tie onto the dress, raw edges of the tie lined up with the edge of the apron, on the front side (see below).
Time to bias-bind the edge! The dress already sported a dark-blue binding at the waist, but I couldn't match that from my stash, *and* I didn't have any blue thread. So I went with a cream binding. You can use single or double-fold (double is probably easier). Stitch it to the apron, right side of bias tape to WRONG side of apron, right along the fold-line, which is 1/4 inch. Make sure your waist tie stays on the front side of the apron.
Next, press the bias binding outwards (trying not to destroy the pre-set folds in it), then turn it over the edge and pin it neatly, before you machine stitch all the way around. Look how the folded edge catches the tie end so nicely.
The waist ties look good . . .
The back looks good . . .
The front looks good! Now it's going across the road to Phyllis' house. She has blue eyes and will look marvelous in it.
For another dress to apron fix, check my etsy shop.


Wow. I have a couple of dresses that are a little out of style and a little tight. I might just try this!!
ReplyDeleteWhat a wonderful transformation! Your friend is sure to love it, and look amazing in it with blue eyes.
ReplyDeleteOh, to have your vision and your industriouness!
ReplyDeletePhyllis will be so happy!
What a BEAUTIFUL dress! How creative to make an apron for your blue eyed friend. Shell love it!
ReplyDeleteChristina
Ingenious! Love the adaptation - your friend will be so happy to have this! And as a p.s. - I have some things from Boden that I just love, but I also have a couple of dresses that do indeed fit so strange.
ReplyDeleteThat is so pretty. You are very talented. Your friend is going to love it.
ReplyDeleteHow resourceful! Love it.
ReplyDeleteLucky Phyllis! What a clever idea.
ReplyDelete